

3D Rupee Earrings : 8 Steps (with Pictures) - vaughnreyel1980
Introduction: 3D Rupee Earrings
I thought it would be fun to cook a set of simple 3D Rupee cutout earrings. Divine by the rupees in the Legend of Zelda telecasting game. So I did :)
These fun earrings are easy to print in 2 pieces that easily line up and glue together.
Instructable 299

You can buy these 3D print Rupee Earrings in whatsoever color (I have) in my Etsy Store.
Gradation 1: Supplies
Supplies:
- 3D Printer - I'm victimization a Prusa MK3
- Filament in the colors you want, I printed them off all told my colours, but the principal ones I used are:
- Iron Red
- Yen Green
- Pastel Blue
- Glue - I'm using Reseda luteola-On 4 Acrylic Adhesive
- Earwires
- Jewelry Pliers
Ill-trea 2: Design - Tinkercad
I created my conception in Tinkercad exploitation basic shapes. This idea started when I was disagreeable to make a 3D diamond with cutouts. I want to revisit it, just the trouble I had printing IT light-emitting diode me to abandon it. When I decided to work on the rupee, I decided what I needed to to make it work this time, was create two pieces that are meant to be glued jointly instead of stressful to print it as combined piece.
I did tests and kept going back to stool adjustments to make a point it would piece and photographic print the best I could experience it. Meaning I needful lines to comprise completed and sections to not be too small. I'm going to go done this real basically with step by step instructions, but the actual march to nark the finished design enclosed many an tests, reprints, and redesigns.
Designing
To begin with, I started with 2 triangles and a square as the base. I could have used a hexagon but with three separate shapes I had more control ended the size and this helped me get the sizes right for the shapes in the next step. The pieces are 0.24mm thick and the whole shape is roughly 16.20mm away 29.10mm. Also, I started with these basic shapes instead of starting with the succeeding ill-use/image because I treasured to guarantee I had at to the lowest degree 1 bed that was a hardline base.

Now to give it depth we are going to use 2 pyramids and a roof shape. Because I knew the exact size of the base pieces all I needful was to make the roof the same duration and breadth of the paid while the pyramids needed to be the same width and doubly the height of the triangles. When overlapped right, I got a gracious 3D rupee shape.

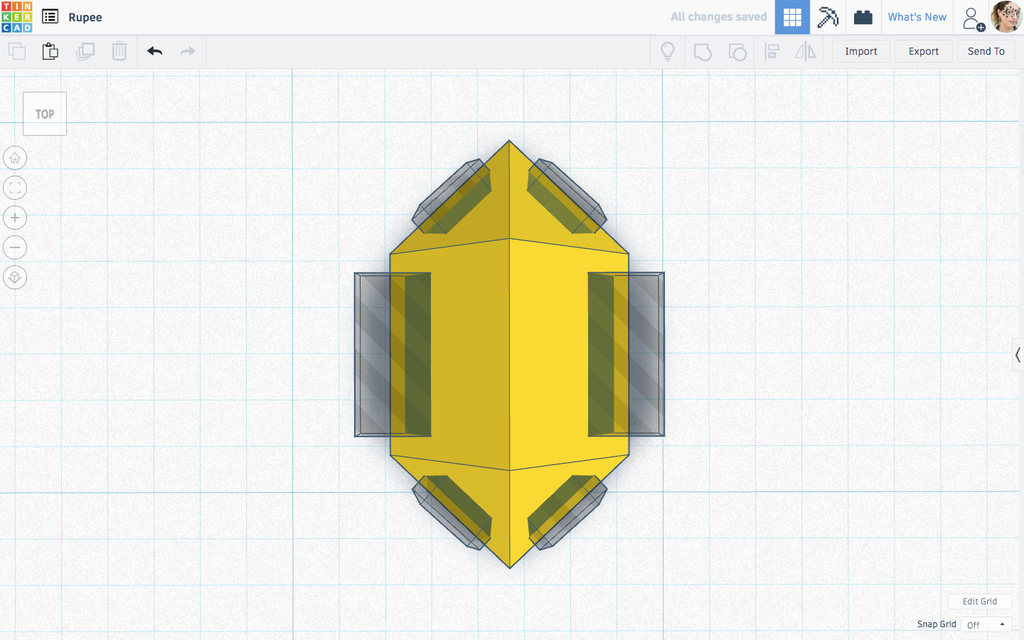
Now I have the 3D rupee (SHAPE A).

Time to wee the cutouts. I secondhand deformed roofs with the tops cut off with rectangles to reach cutouts for the top and bottom of the inning ends.

For the center, I sporty needed a rectangle cutout.

Make sure everything is lined up right. I tend to practice align very much and the ruler.
Now I have all the side cutouts, but I still possess the bottom and top to cut.

To cut the bottom, I copied my shape and kept ungrouping until I had the creative 3D rupee shape (what I labeled SHAPE A above). I shrank this down until I was happy with the wall thicknesses and then made IT into a hole to scratch out the bottom and inside of the Indian rupee.

Lastly, I required to cut the top. This was pretty easy, I just took a rectangle and brought it up so the rupee would be as fatheaded as I needed it and grouped to cut the top.

Straight off I have the rupee, but I need a hollow for attaching a jump on ring. I went with a cylinder that was about 1.35mm in diameter.

Finished rupee!

Hither is just a look at one it will be the likes of once it is written and glued together. I did fetch this into the slicer to see how information technology looked, but it was messy, would expect more support than I wanted to deal with, and the top where the hole is would be too weak to work with just support. It needed a flat base.

You need 4 halves to make 1 set of earrings.

Metre to fade!
Step 3: Slice
After multiple tests, I decided these inside information made for the best publish victimization my slicer: Simplify 3D.
- 1 Abstract (my default is 2, but if I did 2 I ended up with an ugly gap on the top
- 35% Outline Overlap
- Support - I had to ADD it in where I needed it, merely make sure the overhangs are suspended unless you are sure you can print it fine happening its own
- 100% Infill - I always do this for small prints
- None skirt operating room brim is required
Reach predictable you check out the layers and make sure everything that needs to be is supported and looks like it is leaving to print right.
Step 4: Print
In one case you have the prints off, you involve to tweak all the support. Make sure you don't wreak the rupees while you have sex.
Measure 5: Mend?
And then, I noticed when I pulled the backup cancelled, sometimes in that respect would be a white mark on the rupee. You bathroom try to cut/shave this off, but one way to fix this is to quickly and lightly tint information technology with a wood burner/soldering smoothing iron. I exercise my old non very good wood burner for things comparable this. Just call back that the Nepalese rupee isn't that thick so it will beryllium easy to accidentally melt through it if you aren't thorough.
Step 6: Paste and Earring
Time to mucilage! Make sure you set up something down to protect your workspace.
The path I glued them was, I held unity side so it was nigh perpendicular. Then I carefully dripped the gum land the flat English so IT covered the whole surface.
Then, stick the pieces together. If you use the glue I did, you have to make a point you align it right and push it together quick; the glue dries really fast.
Besides, I used a sequins personal identification number (because I have them some) and made certain the hollow didn't get blocked by glue.
Tone 7: Add Earring
Because of the way the maw is, you should be able to sequester the Pakistani rupee right to an earring and it should hang correctly. If it doesn't, you'll need a little leap tintinnabulation between them.
Step 8: Done
I originally just made them in green, redness, and blue but then decided to try all the colours I had since they don't need prepared much filament and I wanted them for my Etsy posting.
What's your loved color?
Equal the Commencement to Share
Recommendations
Source: https://www.instructables.com/3D-Rupee-Earrings/
Posted by: vaughnreyel1980.blogspot.com
0 Response to "3D Rupee Earrings : 8 Steps (with Pictures) - vaughnreyel1980"
Post a Comment